The Art of Projector Visuals: Understanding Image Scaling
Introduction
Visualization is an integral part of communication, especially in presentation contexts. As technology has evolved, so too has the sophistication of visual presentation tools. One crucial tech that has transformed our ability to share visuals effectively is the projector. Equipped with robust technologies, projectors have the capacity to make or break a presentation. And one of the pivotal technologies at work behind the scenes is image scaling. In this blog, we delve into image scaling, deciphering its essence, importance, impact, techniques and how to optimize it for a superior projector outcome.
What is Image Scaling on a Projector?
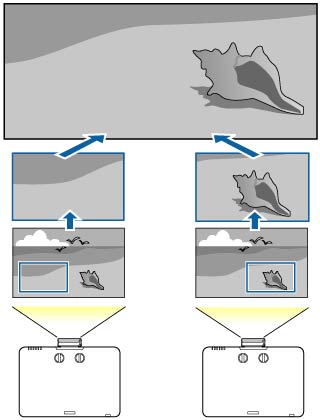
Image scaling refers to a crucial capability embedded within projectors, which involves the manipulation of digital image dimensions. Essentially, it's a transformative process that alters the size of displayed images, conforming them to fit the projector's native resolution. Let's break it down further:
- Primary Function: The key job of image scaling is to adjust the image’s resolution based on the projector's capacity. It enables the projector to display visuals exactly as they should be by either enlarging an image (upscaling) or shrinking it down (downscaling).
- Upscaling: This process implies an expansion of the image’s resolution to match the higher resolution of the projector. It enhances the image’s level of detail and reduces pixel visibility, contributing to a cleaner and crisper image projection.
- Downscaling: Conversely, downscaling reduces an image's size, aligning it to the lower resolution of the projector without compromising the image's important details or clarity.
The role of image scaling transcends beyond just stretching or shrinking an image. It contributes significantly towards maintaining the visual quality, thereby influencing the projector's overall performance.
Why is Image Scaling Essential for Projector Technologies?
The rationale behind the importance of image scaling in projectors becomes undoubtedly clear when we delve into how it impacts the device's functionality and usability.
1. Fit for Purpose: The primary mission of image scaling is to aptly convert an image's resolution so that it fits the projector's native resolution perfectly. This adjustment ensures that the displayed image is void of any stretching or shape distortion, thereby aiding in the clear and precise transmission of visuals.
2. Quality Assurance: Image scaling is essentially a quality management tool for projectors. It ensures that the visual experience retains its quality regardless of the size or resolution of the original image. By resizing images to align with the projector's native resolution, image scaling essentially brushes up the image quality, making it clearer and crisper for viewers.
3. Enhancing Usability: Perhaps one of the most beneficial features of image scaling is how it significantly broadens the projector's compatibility spectrum. By allowing it to adjust and display images from devices with varying resolutions, image scaling contributes to enhancing a projector's flexibility and usability.
So, image scaling isn’t just about technical rigor; it's a key ingredient in making projectors more user-friendly and visual presentations more appealing and impactful.
How Does Image Scaling Impact the Performance of a Projector?
Image scaling commands considerable sway over a projector's efficiency and performance quality. An inadequately scaled image can compromise the quality of your display, leading to issues like pixelation, stretching, distortion, or misalignment. Hence, the role of image scaling in delivering an optimal projector display is profound, as highlighted below:
1. Clarity and Quality Enhancement: When implemented correctly, image scaling augments the projection's clarity and quality. It enhances the sharpness of every pixel, creating a more vivid and appealing visual.
2. Prevents Distortion: Efficient image scaling ensures images retain their aspect ratios, preventing horizontal or vertical stretching that can deform visual content.
3. Smoother Gradients: Correct image scaling can render smoother gradient transitions. This results in a realistic depiction of color shades, which is particularly beneficial for photographs and high-definition visuals.
4. Better Use of Projector's Resolution: Image scaling guarantees that every pixel of the projector's resolution is put to effective use. This leaves no room for undesirable artifacts and ensures each detail of the image or text is crisp and clear.

5. Mitigation of Pixelation: Scaling processes avoid the blocky and blurry look, known as pixelation, that can occur if an image is enlarged without consideration for the projector's native specifications.
6. Enhanced User Experience: Ultimately, proficient image scaling translates into improved visual experiences for the audience, making presentations more engaging and effective.
Therefore, image scaling has a direct and monumental impact on a projector's performance, making it a key factor in optimum projector functioning.
What are the Various Techniques Used in Image Scaling?
There are various techniques that can be deployed for projector image scaling. Each technique has distinct methodologies that profoundly impact the projector's performance and visual output. Here are three key methods you should know about:
1. Nearest Neighbor: This is a basic and fast technique. It selects the pixel color from the nearest pixel of the input image for scaling. However, this method might lead to noticeable distortions if the scaling factor is not an integer value.
Pros:
- Quick and simple.
- Requires minimal computation.
Cons:
- Pixel resolutions that don't align with integer values may lead to distorted images.
2. Bilinear Interpolation: This method represents an upgrade over the nearest neighbor. It uses information from the closest 2x2 pixel grid surrounding a point for resizing. This offers smoother transitions in visuals, making it quite effective at moderate scaling scenarios.
Pros:
- Ensures smoother images.
- Efficient for moderate upscaling and downscaling.
Cons:
- Image quality can suffer with massive scaling due to blurring.

3. Bicubic Interpolation: This is a more sophisticated technique that uses a 4x4 pixel grid instead of a 2x2. By incorporating cubic polynomials, this method ensures sharper visuals and smoother gradients than the other two techniques.
Pros:
- Provides sharper visuals with smoother gradients.
- Ideal for larger scaling scenarios.
Cons:
- Requires higher computational resources.
- May be slower than other methods due to complex computations involved.
By understanding these techniques, users can choose the appropriate projector based on their unique needs, and better appreciate the complexities and capabilities of projector technology.
How to Optimize Image Scaling for Superior Projector Outcome?
Efficient and effective image scaling can substantially augment projector clarity, color vibrancy, and the overall viewing experience. Here are the key strategies to optimize image scaling:
1. Match Source Output to Projector's Native Resolution: Determine your projector's native resolution and attempt to mirror the resolution of your output source to it as much as possible. This step reduces the necessity for major image scaling, thereby preventing potential loss of image quality or information.
2. Minimize Extreme Upscaling: Upscaling tends to magnify every pixel, which may distort images by making individual pixels perceptible—a phenomenon known as pixelation. To retain image details, avoid extreme upscaling; if necessary, upscale moderately or invest in projectors with higher native resolutions that require less upscaling.
3. Consider the Scaling Technique: Not all image scaling techniques are created equal - some provide superior results. While simpler techniques like nearest neighbor and bilinear are fast, they may compromise on visual quality. For sharper visuals and smoother gradients, opt for superior scaling techniques like bicubic or better processing.
4. Regularly Calibrate Your Projector: Regular projector calibration is vital for maintaining optimal image scaling. It helps identify and rectify any distortions or performance issues proactively, ensuring image scaling remains top-notch.
5. Opt for Progressive Scanning Over Interlaced Scanning: Progressive scanning shows the entire picture at once, delivering a more detailed image, whereas interlaced scanning displays alternate rows, which could result in inferior image quality.
To give you an idea of the difference proper image scaling can make, consider this: a projector without optimized image scaling might display an image at a resolution of 800 x 600 pixels, while the same projector, properly optimized, could show an image at 1920 x 1080 pixels. That's over twice the resolution, leading to a much crisper, detailed visual experience.
In conclusion, understanding and optimizing image scaling is key to harnessing the full potential of your projector. By employing the strategies outlined above, you can ensure a more vivid and impactful visualization, ultimately leading to a more engaging and effective presentation.
Conclusion
Image scaling is a critical component in the functioning and performance of projectors. By better understanding it and employing optimization strategies, we can ensure superior projector outcomes and impactful presentations. With technology continually evolving, the advancements in projector image scaling are sure to pave the way for even more impressive visualization tools in the future.
Related FAQs about what is image scaling on a projector
What is the connection between image scaling and projector resolution?
Image scaling and projector resolution are interlinked, as image scaling is the process that matches the resolution of an input image to the native resolution of the projector. It either enlarges (upscales) or reduces (downscales) the image size to fit the projector’s resolution, thus ensuring the best visual quality.
How does image scaling affect the quality of output on projectors?
Effective image scaling significantly enhances the projector's output quality. It ensures that the image fits perfectly into the projector's resolution, preventing distortions and enhancing clarity. It also ensures a smoother gradient transition and reduces pixelation for a crisp, high-quality visual display.
What are some common issues with projector image scaling and how to overcome them?
Common issues with projector image scaling include pixelation, image distortion, blurring, and misalignment. These can be mitigated by matching the source output to the projector's native resolution, minimizing extreme upscaling, considering the scaling technique, calibrating the projector regularly, and opting for progressive scanning over interlaced scanning.


